Saturday, September 28, 2013

A table for 8 or more...DIY

After moving into our new home, our tiny apartment dining table just wasn't cutting it. After searching and searching (department stores, ikea, craigslist...and on and on) and not finding anything.  The hubby suggested we make our own. Since he is not one to quickly suggest any project, and usually ends up reluctantly helping me with my latest endeavor I jumped at his suggestion and started looking for a design. We settled on something we could do without having to run out and buy a table saw, since we are both relatively novice when it comes to working with wood we needed something we could do with only a few tools (drill, sander, hack saw, time and a lot of muscle). We based our design on this gorgeous creation from a beautiful mess http://www.abeautifulmess.com/2012/12/elsies-.html

We made a few modifications to suit our own needs - I have done my best to summarize our process below. I must say this is my favourite creation to date and we have already had many nights of game playing, dinners with friends and are really enjoying our daily meals at this table. All said and done it took us about 5 days to complete and cost just over $200. I am confident that anyone could complete this project, and I am sure there are little things that can be improved, but for novice wood workers we are very happy with the way this turned out.

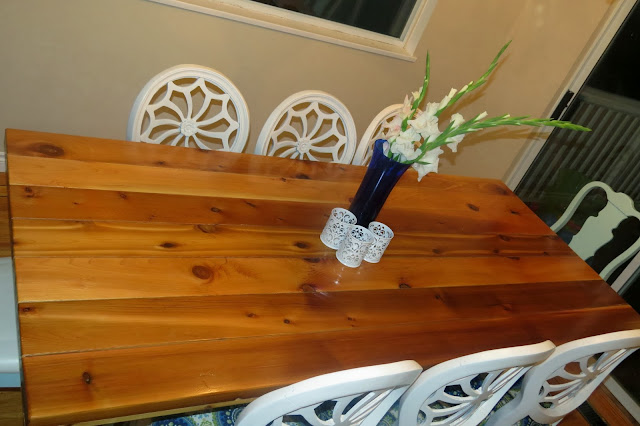
We went big and at 7 feet long can fit 8 - 10 for a great meal! We were able to find 2 matching table bases from a second hand furniture shop (a steal at $50 for the pair) to support this long table top. I am still working on a post about the chairs (they were a great find...but needed a little sweat to get them to what you see below).


Once we settled on our design (and decided the length) we made a list and hit the hardware store. We decided on Red Cedar (which came in 2 x 6 x 8) at home depot and used pine for the framing underneath. We bought the following:
  • 6  planks ( 2 x 6 x 8) of red cedar (we selected carefully and looked for pieces that we liked the look of and had them cut down to 7 feet long at the store)
  • 2 planks of (1 x 6 x 8 ) pine (used underneath for framing)
  • 3 pieces of (1 x 2 x 8) pine (used underneath for framing)
  • 100 wood screws
  • 2 quarts of polyurthane seal (+ brushes)
  • 1 tube of silicone caulking
  • Tack cloths (to remove debris prior to sealing
We also needed the use of a palm sander, and a hack saw with cutting box. It dosent look like much below - but we hoped it would end up looking like a table! Cost for the wood and supplies was approx $160.


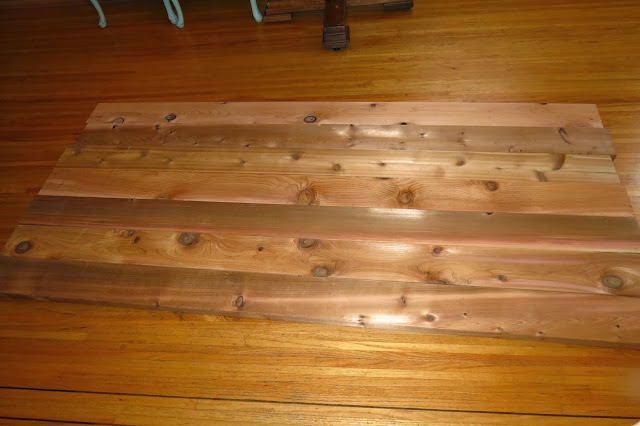
Next we laid out a pattern of how we wanted the table to look (which planks looked best and in what order).


Since we used 2 x 6's we decided to beef up the frame slightly from the original design. We also need a space wide enough to affix the table bases.

We flipped over all the boards and worked from the bottom side (of our chosen arrangement above) and started to screw the planks together using the pine as framing starting in the middle (measuring to find the middle of the table). We cut down the pine to fit across the width of the table and screwed away (we used at least 10 screws per pine plank). We used the whole box of 100 - it definitely added strength. I ended us sitting on top of the planks and holding them in place while the hubby screwed.


Then we added additional framing on either side (where we would later attach the 2 table bases).  


Finally we used the 1 x 2's  to frame around the outside, making the cuts as we went using our hack saw, then screw, screw, screw...


Then came the time consuming part of the project, sanding and sealing. Since we intended on using this table for a lot of eating, we used clear silicone to seal the gaps in between the planks so food particles would not gather there over time.

We sanded the table top  and all of the framing around the edges, and then 6 coats of polyurethane (something that the hubby did all of and I was so grateful).


Finally we attached the table bases (which eventually we will paint, but for now we have left as we purchased them second hand).


and shortly after.. our first round of carcissone (looks pretty good). We can't wait to host our first big thanksgiving dinner in October.


Thursday, September 12, 2013

Easy Peanut Butter and Oat Cookies (Gluten free)

In the morning I usually check in with Miss. P and ask her - what we should do today? 9 times out of 10 she says baking! Since I don't really consider myself 'good' at baking, it makes me so happy to know that she loves it, even if it doesn't always end up the way we thought it might.

I think the key to decent baking (if you don't consider yourself a baker) is to pick and stick with some easy recipes that always yield good results. Limited on ingredients (meaning its been a bit since grocery day) I looked for something that we could make with whatever we had on hand.This recipe was very easy, had only a few ingredients and the cookies turned out moist and chewy (bonus they are gluten free).


I found the original recipe here http://www.tasteofhome.com/recipes/peanut-butter-oatmeal-cookies-4, but doubted the yeild so I doubled it (as below). Next time I will try some add-ons (chocolate chips, coconut?)...

Peanut Butter & Oat cookies (approx 24 cookies)

Ingredients
  • 1 cup Peanut Butter 
  • 1 cup packed brown sugar
  • 2 eggs 
  • 1 ½ cups quick-cooking oats
  • 1 teaspoon baking soda
Instructions
  1. Pre heat oven to 350°
  2. In a medium bowl, cream peanut butter and brown sugar until fluffy.
  3. Beat in egg.Add oats and baking soda to mixture and mix well. 
  4. Place spoonfuls on greased baking sheet 2 in. apart and flatten slightly.
  5. Bake at 350° for 8 - 10 minutes (I found they need at least 10 minutes in my oven).
  6. Store in an airtight container (if they don’t get eaten right off the cookie sheet!!).
Here we go...


They didn't last very long...

Monday, September 2, 2013

Chocolate Coconut bites...and a beach date


With friends in town, it was a perfect night for sushi and treats on gorgeous kits beach. I have been wanting to try theses for a while ... so here goes. I found the original recipe here http://fastpaleo.com/recipe/dark-chocolate-coconut-bites/ , but adapted it a little (complete instructions at the end of this post).
Yummy!


Great shot!
 Ingredients
  • 1 1/4 cup shredded coconut
  • 1/4 cup melted butter
  • 2 tablespoons honey or maple syrup
  • 1 teaspoon pure vanilla extract
  • 4 ounces dark chocolate
  • Garnish (thick cut coconut, almonds or pecan) 


All packed up and ready for a beach picnic!
 Instructions


1.      In a bowl, mix coconut, butter, honey/maple syrup and vanilla extract
2.      Press into an ice cube tray (should make about 24 bites).
3.      Let cool in the freezer for 30 minutes.
4.      Melt the dark chocolate then spoon over top of the coconut mixture in ice cube tray.
5.      Top with garnish and freeze again until hardened.
6.      When ready to eat, let them come to room temperature for a few minutes, then enjoy (dont we look happy below??).


Tuesday, July 30, 2013

Homemade Baby Food


Homemade baby food is very easy to make and a great way to preserve food that you may not use before it goes to waste. In this case we were headed away on holidays, a friend had been staying with us and had stocked our fridge with amazing organic produce. I could not face seeing in the compost bin  - so an hour of peeling, steaming and blending and Mr. O has a great stock of homemade food to come home to. For tips and recipes there is a great website called Wholesome Baby Food http://wholesomebabyfood.momtastic.com/ .

I guess the big question is why go to all the trouble to make homemade food? Although I am sure there are a tons of answers...this is what motivates me:
- It's easy
- Cost efficient (you can definitely save a few dollars)
- Quality control (you know exactly what is in there)
- It helps to decrease waste (of both food (that may go bad) and the packaging that store bought food comes in)

General guidelines for storing frozen baby food can be found here: http://wholesomebabyfood.momtastic.com/FreezePage.htm

Mrs. P and I got to work washing, chopping and peeling - we steamed carrots, broccoli, apples and boiled plums.


Next out came the containers for a wash and rinse. When Poppy was born I did invest in some great baby food containers that were on sale at toysrus http://www.toysrus.com/product/index.jsp?productId=12066912 - but an ice cube tray works just as well.


I have a super old school blender, but it does the trick. Once everything was steamed, I ran each batch through the blender (it helps to save some of the water used for steaming and add a small amount at a time to to the mixture to get a smooth consistency while blending). 

Finally I mixed a couple of the purees together to spice things up for Mr. O. his favourite seems to be Apple-Carrot, but I also did Broccoli-carrot combo and left the plums on their own

 Everything was labeled up and put in the freezer for when we get back from our vacation.

Tips on thawing and heating can be found here: http://wholesomebabyfood.momtastic.com/heatandthawhomemadebabyfood.htm#.UfiCn22kM7Y

I ended up with quite a bit of food that almost went into the compost bin!

Saturday, July 13, 2013

Max's Bday party...calls for a DINOSAUR hoodie.

Miss P's bestie was turning 2 and what better gift for a little boy then a hoodie that turns you into a DINOSAUR! Of course the idea came from pinterest...

Materials needed
  • Hoodie (I purchased this one from walmart for $8) 
  • 3 pieces of felt (which I found 3 for .99 at the local dollar store)
Here is the finished product (looking very handsome on Mr. Max I must say!):


Party day!! Happy Birthday Max! 

Start off by cutting the felt into diamonds, a few sizes (smaller for the top and larger down the back), then pinning them along the middle of the sweater


Sew one straight line down the middle of all of the pinned diamonds


Next fold each triangle in half and sew around the edge


And here it is....

Now Miss P is dying for one...maybe purple and pink? 

Here is the link to the original tutorial I found on pinterest http://diyingtobedomestic.wordpress.com/2011/09/23/dinosaur-hoodie/


Monday, June 17, 2013

Hiking in the woods = Carrot muffins!

Our family (the hubby and I) are training for tough mudder http://toughmudder.com/events/whistler-2013/ and with that comes a weekly hike. This week we decided to change it up and do the Lynn Valley Loop (and carry the kids) http://www.vancouvertrails.com/trails/lynn-loop/. This definitely called for a yummy snack and I have been meaning to try out carrot muffins for a little while.

Enjoying our muffins post-hike!
Poppy and I got to work so that we would have something in time for our after work hike. I adapted the recipe from here http://allrecipes.com/recipe/awesome-carrot-muffins/  - omitted the raisins and used pumpkin seeds instead. The recipe only made 7 larger size muffins, I would likely double it up next time.


Tidying up while our muffins bake...